The Git Rebase Introduction I Wish I'd Had
If you don't know what rebasing in Git is, read this before it's too late. Especially if you love cupcakes!
One of the most important (and confusing) git features in my new job was rebasing. Looking back now, the worst part was not finding a clear beginner's guide. So for the past me, and any future devs like the past me, this intro is for you!
Another small note to the past me from college: use Jekyll for your personal website. Don't waste your meager college budget on hosting a WordPress site...
Anyway, please enjoy! This article assumes you have basic knowledge of git and version control, and love cupcakes. You'll see why.
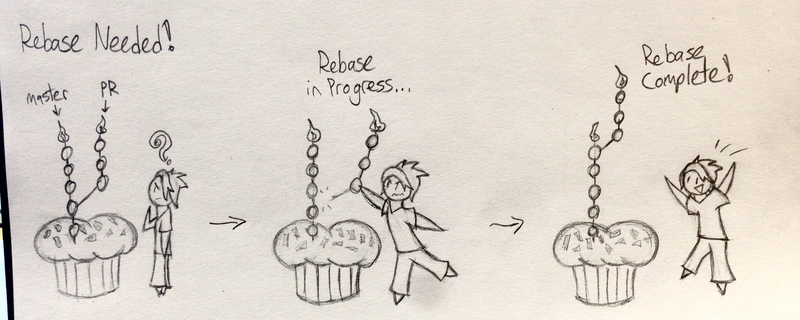
First, why would I Need to Rebase Something? #
Let's say you're a junior dev starting at a cupcake store called Cupid's Cupcakes. It does lots of online selling, and has many experienced devs constantly improving it. You're brought in to mostly work on the front-end.
Your first assignment is updating a card component. When people look for cupcakes to buy, each is in one of these cards. So you go to the repo, pull the most recent version of the master branch, create a new branch from that one, and get to work!
A few commits later, you're all set. The card looks nicer, all the tests pass, and you've even improved the mobile layout. All that's left is to merge your feature branch back into master branch so it goes live!
But wait a moment!
Unsurprisingly, other people were working on the site while you were making this card component.
- One developer changed the navigation
- One adjusted the database fields to remove unneeded info
- Another added extra info about each cupcake
- Someone else secretly embezzled money through the store's bank records
All these changes make you worry. What if someone merged a change that affects or overlaps with the ones you made? It could lead to bugs in the cupcake website! If you look at the different changes made, one does! (Another change should be reported to the police, but that's actually less important). Is there a safe way to merge your changes without risking any conflicts, and missing out on all the other changes made?
Situations like these are a big example of when you'd want to rebase.
What are the details of Rebasing? #
Let's say when you created your branch off of the master branch, the master branch was on commit #1. Every commit in your branch was layered on top of commit #1. When you're ready to merge your branch, you discover other developers made changes and the most recent commit is commit #5.
Rebasing is taking all your branch's commits and adding them on top of commit #5 instead of commit #1. If you consider commit #1 as the "base" of your branch, you're changing that base to the most recent one, commit #5. Hence why it's called rebasing!
Okay, so HOW do I Rebase something? #
So you've got this great card component for Cupid's Cupcakes. Now that you know what a rebase is, let's look at the how in more detail.
First, make sure you have the most up-to-date version of the branch you're rebasing on. Let's keep assuming it's the master branch in this example. Run git checkout master to, y'know, check it out, and then run git pull to get the most recent version. Then checkout your branch again - here's it'd be with git checkout updated-card or something similar.
A straightforward rebase has a pretty simple command structure: git rebase <branch>. branch is the one you're rebasing off of. So here you'd run git rebase master. Assuming there's no conflicts, that's all the rebase needs!
The rebase itself technically removes your old commits and makes new commits identical to them, rewriting the repo's commit history. That means pushing the rebase to the remote repo will need some extra juice. Using git push --force will do the trick fine, but a safer option is git push --force-with-lease. The latter will alert you of any upstream changes you hadn't noticed and prevent the push. This way you avoid overwriting anyone else's work, so it's the safer option.
With all that, your rebase is now complete! However, rebases won't always go so smoothly...
How do I Handle Rebase Conflicts? #
Remember how we worried our new card would conflict with someone else's changes? Turns out, one does! One developer added extra info onto the new cupcake card, such as calorie count or how many elves it takes to make it at night. The updated markups from both sets of change are in the same lines - this means the rebase can't happen automatically. Git won't know which parts of the changes to keep and which to remove. It must be resolved!
Thankfully, git makes this very easy. During the rebase, git adds each commit onto the new base one by one. If it reaches a commit with a conflict, it'll pause the rebase and resume once it's fixed.
If you've dealt with merge conflicts before, rebase conflicts are handled essentially the same way. Running git status will tell you where the conflicts are, and the two conflicting sections of code will be next to each other so you can decide how to fix them.
Once everything is fixed, add and commit the changes like you would a normal merge conflict. Then run git rebase --continue so git can rebase the rest of your commits. It'll pause for any more conflicts, and once they're set you just need to push --force-with-lease.
There's two lesser-used options you could also use. One is git rebase --abort, which would bring you back to before you started the rebase. It's useful for unexpected conflicts that you can't rush a decision for. Another is git rebase --skip, which skips over the commit causing the conflict altogether. Unless it's an unneeded commit and you're feeling lazy, you likely won't use it much.
Can I Get Extra Control of the Rebase Process? #
As you can see, Git Rebasing is powerful. As certain trademarked heroes have told us, great power brings great responsibility. Thankfully, rebasing lets you take more control over the process.
To do so, just include the --interactive, or -i, flag in your command! For our cupcake rebase, it'd be git rebase -i master.
This shows a list of all the commits you're about to rebase. You can choose which ones to stop and edit, which ones to skip, and even merge some together! I won't go into too much detail here, but this article is a good starting point to read more.
Also be warned: all this is done through a VIM interface, which is very useful and even more difficult to learn. To run the rebase as is, press esc + : + w + q + enter. I'll leave tutorials explaining what that means, and the rest of VIM, to someone else.
Lastly, a useful Rebasing trick: Autosquashing! #
In interactive rebases, one useful trick I want to share is autosquashing commits. This is merging two commits together and renaming the new one. If you have lots of small, similar commits that could be combined, or need to amend an older commit, this is a great trick. Rebasing makes it easy to do this with the wonderful "autosquash."
Let's say we've got five commits in our branch for Cupid Cupcake's new card. We then realize we missed a small detail in the 2nd commit! If we want to keep our commit history clean, we need to merge this change into the second commit.
We do this using a fixup commit, which is done like so:
- Make and stage your changes.
- Get the ID of the commit you want to add them too. for our example, let's say it's 123456ABCD. You can find this by running
git log. - The formula for a fixup commit is
git commit --fixup <commitID>. In this case, we'd usegit commit --fixup 123456ABCD. This will commit the changes as normal, but the name will be the same as our second commit, and have "fixup!" prepended. - Next we run a rebase, but it's important to include the right parameters! We'd run
git rebase -i --autosquash master. - We'll see the normal page for an interactive rebase, with all our commits listed in the VIM interface. But our fixup commit will be right below our second commit, set up to be merged into it automatically!
- Run the rebase and your commits will combine automatically! If there's a conflict it'll ask you to resolve it like normal, and the rebase will continue.
This is incredibly useful for updating commits without polluting the history with lots of "small fix" changes that make it tedious and confusing. The best commit histories tell an understandable story. Autosquashing keeps it from getting overwhelmed by obnoxious footnotes. So make use of it!
Enjoy your Cupcakes! #
Hopefully this post helped explain the basics of git rebasing, what it does, and how to start making use of it. Finally understanding rebases myself has made them a frequent, essential tool for my job. I hope other junior devs can do the same without some of the frustrations/post-push panic attacks I had in the process.
After all, we all want to help more people buy and eat cupcakes, don't we? Of course! Git Rebasing, like all good things, brings us closer to that goal.
- Next Post: Take Notes on Everything
- Previous Post: Three Helpful Rules for Junior Devs